> ## Documentation Index
> Fetch the complete documentation index at: https://docs.staging.alpic.ai/llms.txt
> Use this file to discover all available pages before exploring further.
# Alpic MCP Server
> Manage your projects, debug deployment, and check analytics for any MCP server you host with Alpic
### Overview
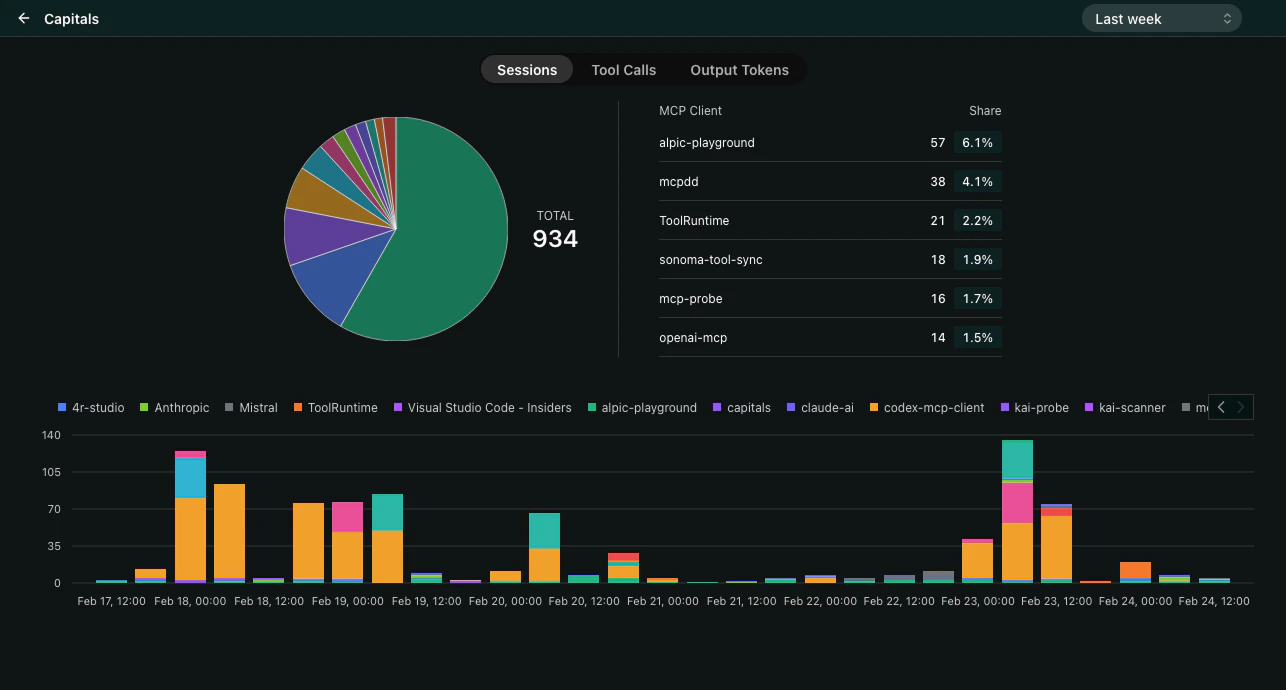
The Alpic MCP Server is a hosted MCP server at `mcp.alpic.ai` that lets you interact with your Alpic account from any MCP-compatible client. You can browse teams and projects, inspect deployment logs, and review analytics.
### Available Tools
| Tool | Description |
| ----------------- | ------------------------------------------------------------------- |
| `list-teams` | List all teams you belong to. |
| `list-projects` | List all projects for a given team. |
| `deployment-logs` | Fetch deployment logs for a specific project and environment. |
| `get-analytics` | Retrieve analytics data (sessions, requests, errors) for a project. |
#### Project Browser Widget
The `list-projects` tool returns a widget that displays your projects as interactive cards. Each card shows the project name, environment status, and key analytics at a glance. The widget supports both inline and fullscreen display modes so you can quickly scan your projects or dive deeper into a specific one.
 ### Connect Your MCP Client
Run the following command to add the Alpic MCP server:
```bash theme={null}
claude mcp add alpic --transport http https://mcp.alpic.ai/
```
In your Claude Code session, run `/mcp` and select the Alpic server. This will open your browser to authenticate with your Alpic account.
Once authenticated, Claude Code can use the Alpic tools directly. Try asking it to list your teams.
Add the following to your `claude_desktop_config.json`:
```json theme={null}
{
"mcpServers": {
"alpic": {
"command": "npx",
"args": ["-y", "mcp-remote", "https://mcp.alpic.ai/"]
}
}
}
```
On macOS, the config file is located at `~/Library/Application Support/Claude/claude_desktop_config.json`.
On Windows, it is at `%APPDATA%\Claude\claude_desktop_config.json`.
When opening Claude Desktop, a browser page will open to authenticate with your Alpic account.
Open a new conversation and ask Claude about your Alpic projects.
### Connect Your MCP Client
Run the following command to add the Alpic MCP server:
```bash theme={null}
claude mcp add alpic --transport http https://mcp.alpic.ai/
```
In your Claude Code session, run `/mcp` and select the Alpic server. This will open your browser to authenticate with your Alpic account.
Once authenticated, Claude Code can use the Alpic tools directly. Try asking it to list your teams.
Add the following to your `claude_desktop_config.json`:
```json theme={null}
{
"mcpServers": {
"alpic": {
"command": "npx",
"args": ["-y", "mcp-remote", "https://mcp.alpic.ai/"]
}
}
}
```
On macOS, the config file is located at `~/Library/Application Support/Claude/claude_desktop_config.json`.
On Windows, it is at `%APPDATA%\Claude\claude_desktop_config.json`.
When opening Claude Desktop, a browser page will open to authenticate with your Alpic account.
Open a new conversation and ask Claude about your Alpic projects.
 Or manually add the following to your `.vscode/mcp.json` at the root of your workspace:
```json theme={null}
{
"servers": {
"alpic": {
"url": "https://mcp.alpic.ai/",
"type": "http"
}
}
}
```
You can also configure MCP servers globally instead of per-workspace.
On macOS, the global config is at `~/Library/Application Support/Code/User/mcp.json`.
On Windows, it is at `%APPDATA%\Code\User\mcp.json`.
When opening VS Code, a browser page will open to authenticate with your Alpic account.
Open a new conversation and ask Copilot about your Alpic projects.
Or manually add the following to your `.vscode/mcp.json` at the root of your workspace:
```json theme={null}
{
"servers": {
"alpic": {
"url": "https://mcp.alpic.ai/",
"type": "http"
}
}
}
```
You can also configure MCP servers globally instead of per-workspace.
On macOS, the global config is at `~/Library/Application Support/Code/User/mcp.json`.
On Windows, it is at `%APPDATA%\Code\User\mcp.json`.
When opening VS Code, a browser page will open to authenticate with your Alpic account.
Open a new conversation and ask Copilot about your Alpic projects.
 Or manually add the following to your `~/.cursor/mcp.json`:
```json theme={null}
{
"mcpServers": {
"alpic": {
"url": "https://mcp.alpic.ai/",
"type": "http"
}
}
}
```
Go to **Cursor Settings → Tools and MCP** and hit **Connect** on the Alpic server. This will open your browser to authenticate with your Alpic account.
Open a new chat and ask Cursor about your Alpic projects.
### Clients supporting MCP Apps
Our MCP Server is using the MCP Apps extension that allows rendering of rich UI interfaces through custom Views. When used with MCP Apps compatible clients, it provides interactive visual components alongside the standard tool responses.
In ChatGPT, go to **Settings → Apps**.
Click **Create** and paste the following URL:
```
https://mcp.alpic.ai/
```
Select the OAuth authentication flow and leave the optional fields empty.
Hit create and you will be prompted to connect using your Alpic account.
Open a new conversation and ask ChatGPT about your Alpic projects. It will use the connected tools automatically.
On [claude.ai](https://claude.ai), go to **Settings → Connectors**.
Click **Add connector** and paste the following URL:
```
https://mcp.alpic.ai/mcp
```
Hit create and you will be prompted to connect using your Alpic account.
Open a new conversation and ask Claude about your Alpic projects. It will use the connected tools automatically.
Or manually add the following to your `~/.cursor/mcp.json`:
```json theme={null}
{
"mcpServers": {
"alpic": {
"url": "https://mcp.alpic.ai/",
"type": "http"
}
}
}
```
Go to **Cursor Settings → Tools and MCP** and hit **Connect** on the Alpic server. This will open your browser to authenticate with your Alpic account.
Open a new chat and ask Cursor about your Alpic projects.
### Clients supporting MCP Apps
Our MCP Server is using the MCP Apps extension that allows rendering of rich UI interfaces through custom Views. When used with MCP Apps compatible clients, it provides interactive visual components alongside the standard tool responses.
In ChatGPT, go to **Settings → Apps**.
Click **Create** and paste the following URL:
```
https://mcp.alpic.ai/
```
Select the OAuth authentication flow and leave the optional fields empty.
Hit create and you will be prompted to connect using your Alpic account.
Open a new conversation and ask ChatGPT about your Alpic projects. It will use the connected tools automatically.
On [claude.ai](https://claude.ai), go to **Settings → Connectors**.
Click **Add connector** and paste the following URL:
```
https://mcp.alpic.ai/mcp
```
Hit create and you will be prompted to connect using your Alpic account.
Open a new conversation and ask Claude about your Alpic projects. It will use the connected tools automatically.